Another Glaskasten build
Seite 1 von 2 • 1, 2 
 Another Glaskasten build
I'm a new forum member from the little Republic of San Marino.
I found this very active and brilliant forum searching the web for documentation about the PtL 2/2.
Like many of you (I'm sure) I buy and store far more models than the number I will be able to build in my whole life (this is my main regret about model making activity...).
Recently I took out from my "to do" drawer this little jewel from Kurt Fehring I bought many years ago (the subject was too nice to ignore it) and decided to put my hands on it.
As I said before, I started searching the web because I don't have much "phisical" railway documentation at home (I used to build mainly aircraft in the past) and, between my google search results, I saw the building thread by Michael (maxl) on this forum....
WOW!!! I was so amazed by this wonderful build that I soon signed in to the forum to be able to contact the author and have some advice from him.
Needless to say Michael was VERY kind and assured me any help he can give to help me finish my new project.
And so here I am to start this build.
I took a look around here and I found a lot of great works so I'm a little intimidate facing with such masters... but the reason forums exist is - precisely - to help people to grow and learn so I'm sure you will be at my side when I'll be in trouble (if this will happen, and I'm sure it will be!)

Before starting I state my objective won't be to build such a museum quality model like Michael's one (I would not be able to reach such results) but I would like to reach an intermediate detail level from the original Fehring's project and Michael's re-interpretation. I decided to build the loco in the original scale (1:30) so I'll be excused for not going too deep in detailing.

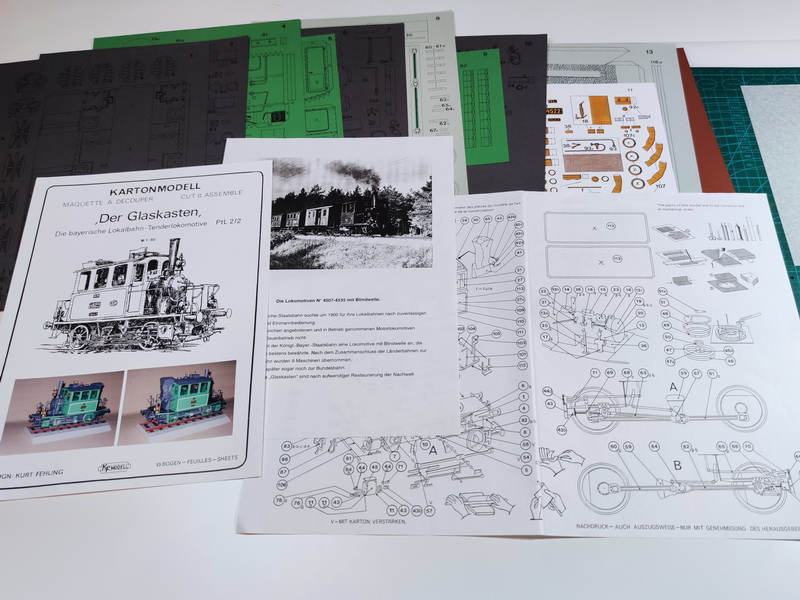
This is my starting point. As you see I don't have any book on the matter. The thread by Michael will be my main reference (and there is a LOT of images and ideas to be inspired).
I usually print and/or build cardmodels in color and don't paint them (except edge colouring and some little details possibly added) but this time, for my very first time, I want to try the kind of paper build I've seen in other threads in this forum: build every surface detail separately (bolts, panels etc.) and then paint the whole thing. This is the first time I proceed this way so I may need some advice from experts around here... I'm sure it will be a very nice trip with your help. I'll try to build most of the model in paper but don't take it as an inviolable rule: like Michael did some of the parts (like pipes) are not satisfactory if realized in paper. Let's face the problem when it will present itself.
Now I'm studying the chassis design and started drawing some details in CorelDraw to getting close to Michael's masterpiece.
More to come soon


Tonino- Mitglied

Frank Kelle, didl, didibuch, maxl, Rudi Bahn, klaus.kl, Lupo60 und mögen diesen Beitrag
 Re: Another Glaskasten build

Frank Kelle- Admin

 Re: Another Glaskasten build
After some study of the little documentation I was able to find and, especially, after a very close watching of every photo posted in Michael's thread, I eventually started actual building.
Here you can see what I've done so far.
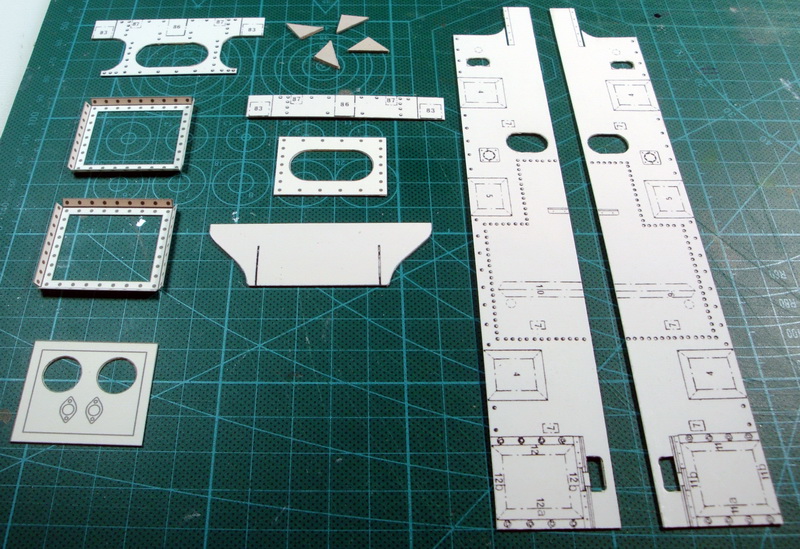
All the frame pieces. Some of them are straight taken from Fehring model, others are my addings to complete the underside of the loco.
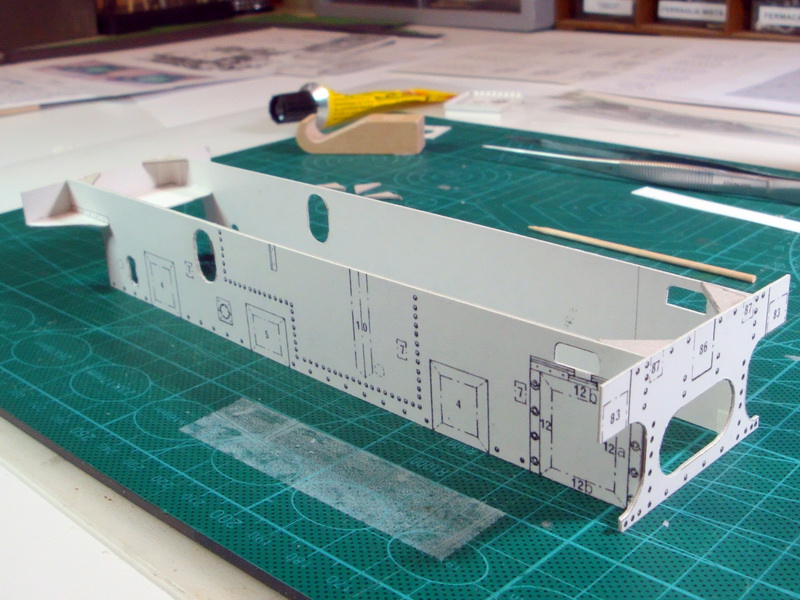
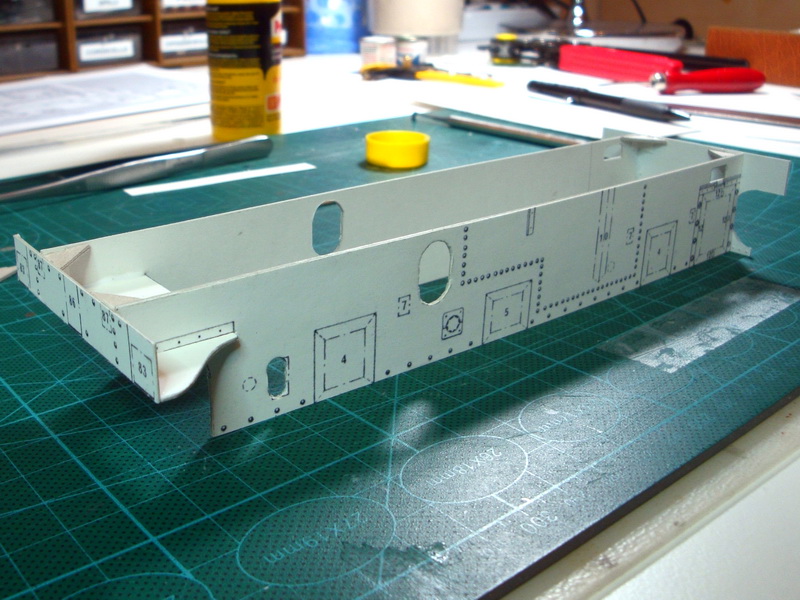
The frame is taking shape

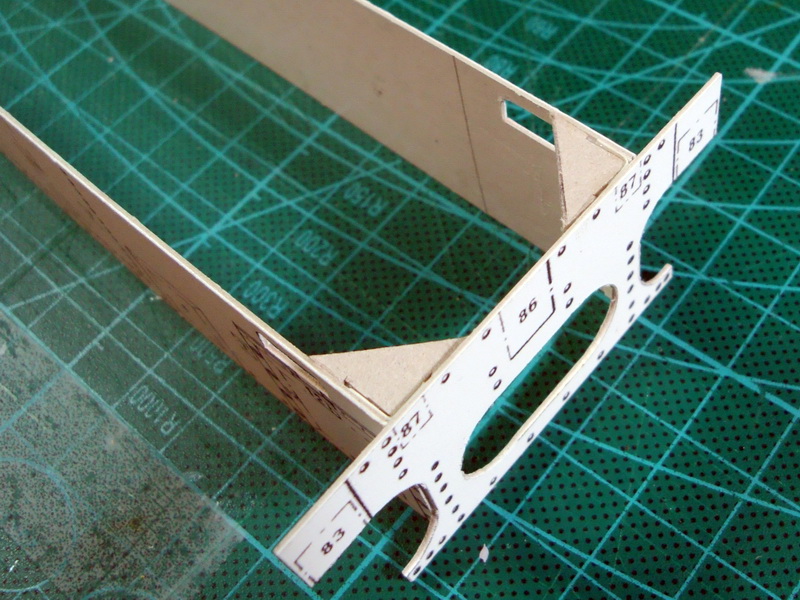
To keep the walls straight I added little triangles in the corners.
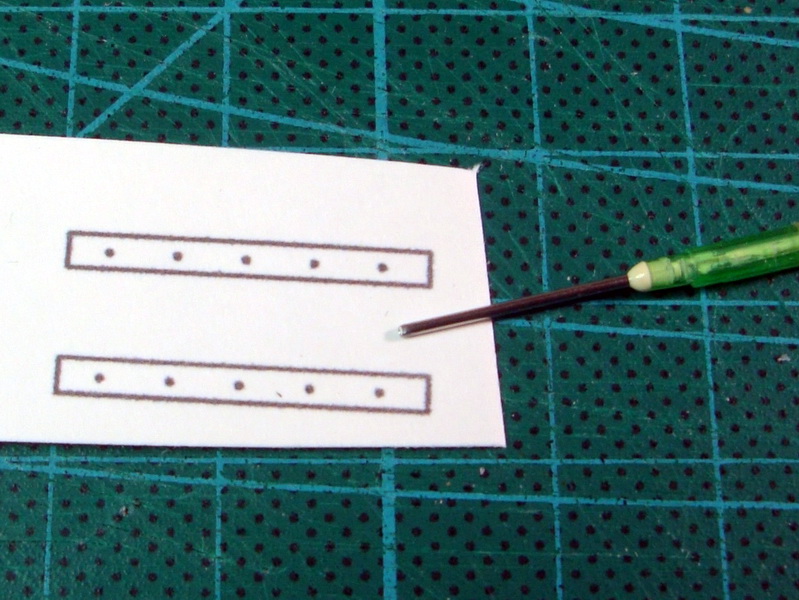
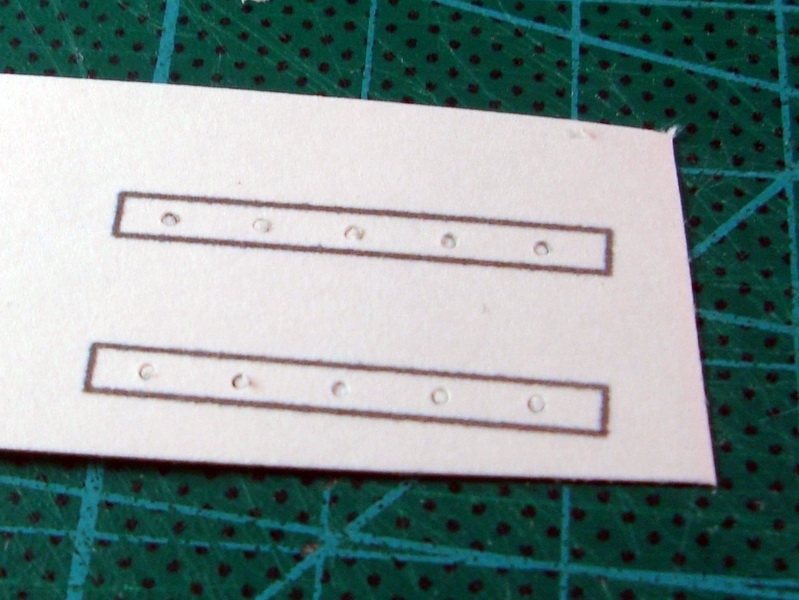
to simulate little bolts I used a syringe needle pressed on the surface.

The first one of the enhanced axis supports

To make greater bolts I used an Hexagonal punch & die set from RP Toolz. Very unvaluable accessory to me.
I decided to use a piece of cardboard to make the bolts so I can glue them with PVA.
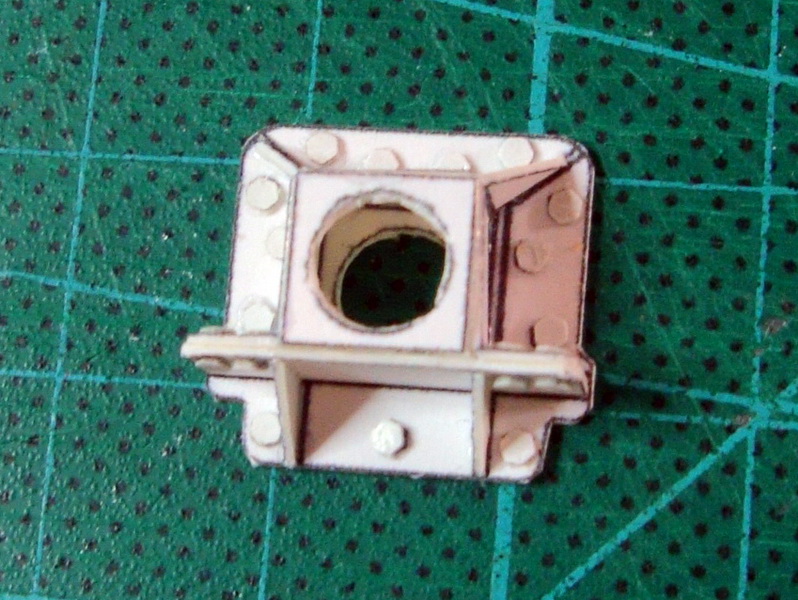
The result is pretty nice.

This is the first wheel axis support done the same way

And this is the first suspension.
This is all for now. See you again the next chapter.

Tonino- Mitglied

Frank Kelle, OldieAndi, didl, doc_raven1000, Glufamichel, didibuch, maxl und mögen diesen Beitrag
 Re: Another Glaskasten build
As fare as I can see you are more than able to get results even better than mine.
I guess I would not be able to do this job in the original Fehling scale 1:30 as precisely as you do.
It is wonderful for me to follow your building steps. Great memories! Keep us informed!
Whenever there are special questions I would be honored in order to help you.
Have fun!
Greetings
Michael

maxl- Forenurgestein

Tonino mag diesen Beitrag
 Re: Another Glaskasten build
maxl schrieb:... As far as I can see you are more than able to get results even better than mine.
Not sure of this... especially if I look at some of the details under your chassis... I'm really scared about the work to be done.
Anyway I wouldn't have started this build if I hadn't found your thread.
maxl schrieb: I guess I would not be able to do this job in the original Fehling scale 1:30 as precisely as you do.
To be honest I chose to maintain the original scale just to have the excuse to ignore some of that bunch of pipes and levers down there ...

maxl schrieb: Whenever there are special questions I would be honored in order to help you.
Rest assured I'll follow your suggestion!
Tonino

Tonino- Mitglied

maxl mag diesen Beitrag
 Re: Another Glaskasten build
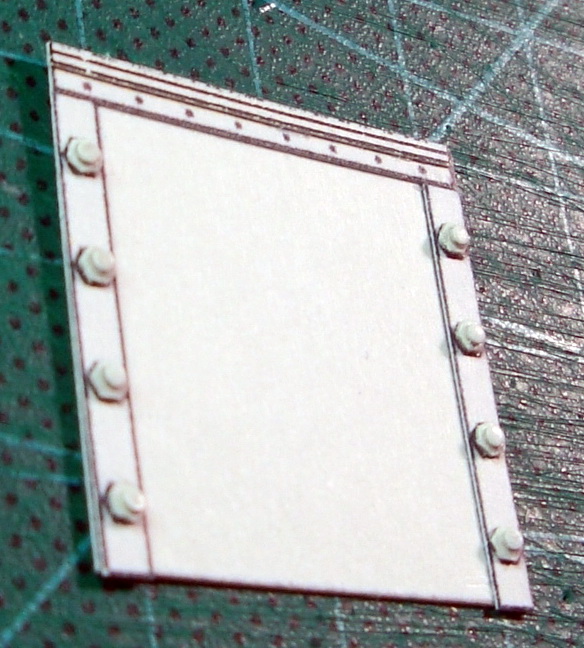
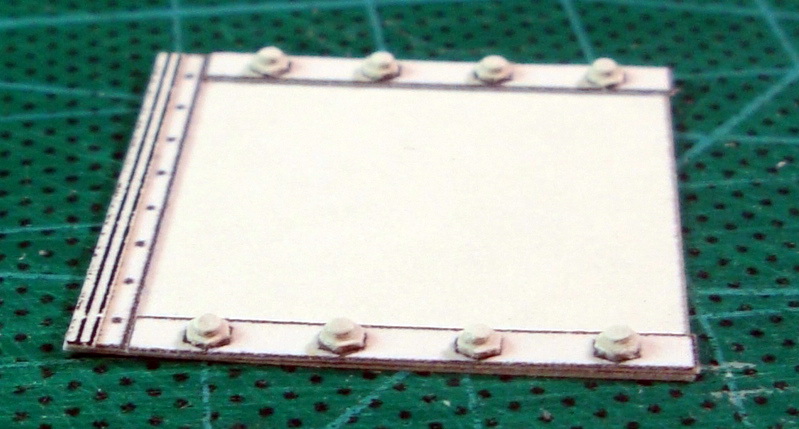
I'm starting to enjoy making bolts. Here I put little circles in the center of the bigger ones (this is the cylinder mounting plate) to simulate the screws.

This is one of the suspension attachements I copied from Michael's build.
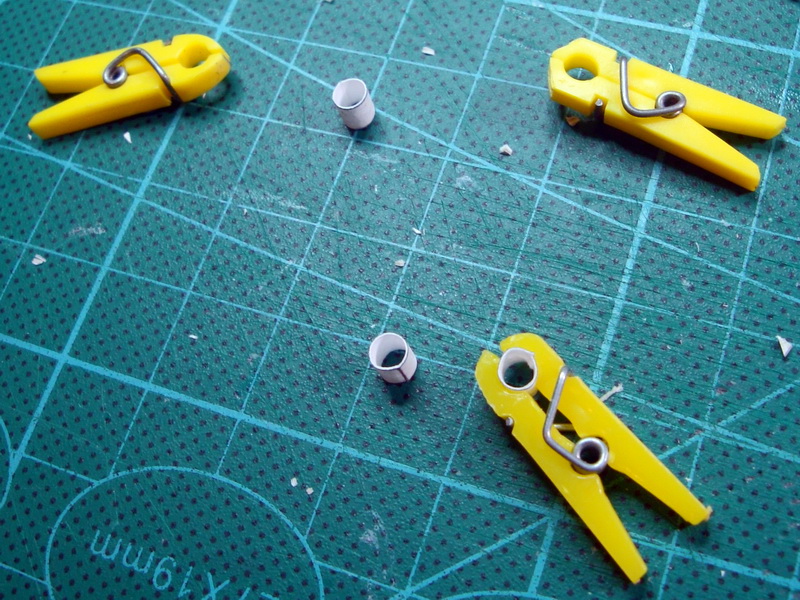
A nice trick to glue little paper cylinders without going mad trying to keep them round while setting.
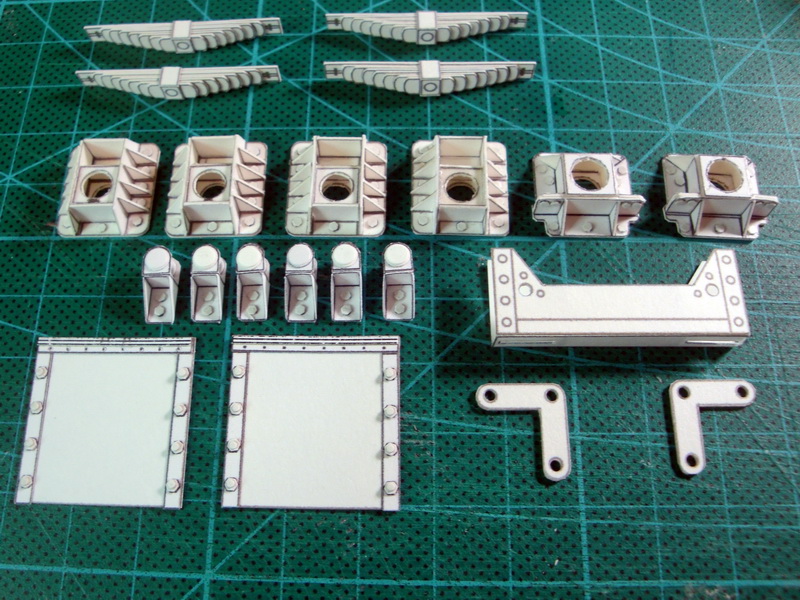
And this is a first batch of chassis parts ready to be attached to main body.
But before doing this I have to solve a rivet dilemma...

I wanted to avoid too much punch'n die work, tried putting little drops of PVA glue to simulate the rivets.
I added some color to the glue to better visualize the drops.
Unfortunately I soonb realized that is very difficult to obtain drops of the same size and shape.
This try was a complete disaster. I have to clean the side wall and restart from the beginning. I must find another solution...

Tonino- Mitglied

Glufamichel, didibuch, maxl, Spur 1, Rudi Bahn, klaus.kl, Lupo60 und mögen diesen Beitrag
 Re: Another Glaskasten build
kind regards from an until now „silent admirer“ and congratulations to what you achieved so far!
When it comes to rivets, there‘s one idea from my side, that I would like to share with you, even though I‘m not sure, if it is complete nonsense:
If you punch a hole through the sheet at rivet position and apply the glue from behind, it should ooze through the hole and protrude like the rivet head you desire. Certainly, there is some optimum ratio between the diameters of the hole and the intended rivet head. Also the amount of glue should be important, but if you apply it with a little tool, e.g. the tip of a screw covered with glue, you can make this parameter reproducible as well.
It‘s just an idea, that I cannot try out in the moment as I‘m not home, but maybe it‘s of use for you.
Anyway, I wish you a lot of fun and success in your further progress with your fine model!

Lupo60- Modellbau-Experte

Tonino mag diesen Beitrag
 Re: Another Glaskasten build
here is another suggestion for your rivets.
https://www.der-lustige-modellbauer.com/t31344-selbstkebende-nieten-nagel-fur-den-schiffsbau?highlight=nieten
see input #4

maxhelene- Schneidmatten-Virtuose

Tonino mag diesen Beitrag
 Re: Another Glaskasten build
Don't worry about the rivets. This part of the locomotive will become almost invisible at the end. Once it's painted it will be absolutely fine.
When I started with my model, I used the smallest nails I could get. This probably will not work in your scale. Later on I used the punch & die set and made the rivets out of thin polystyrol sheets. This works much more precisely in little scales than paper or cardboard.

Instead of the Glaskasten the picture shows the Bubikopf locomotive BR 64 I did afterwards. Anyway - in your scale rivets become tricky...
I wish you luck! You most certainly will find a perfect solution!
I am looking forward to seeing the next steps!
Greetings
Michael

maxl- Forenurgestein

Glufamichel, Rudi Bahn, Classic, Tonino und SvenMo mögen diesen Beitrag
 Re: Another Glaskasten build
Sorry for not posting so long. Last months I had very little time for modelling and even less for sitting down and write something for you.
Thanks so much for your advices, Wolfgang and Robert. Especially the post linked by Robert was very inspiring and gave me some good references to buy very special tools on the web.
Anyway... after several "try and error" I finished to pick up Michael's advice and decided to make most of the rivets with plasticard and my punch'n die sets. I abandoned the idea to punch bolts in cardboard because they tended to delaminate and be destroyed at first touch.
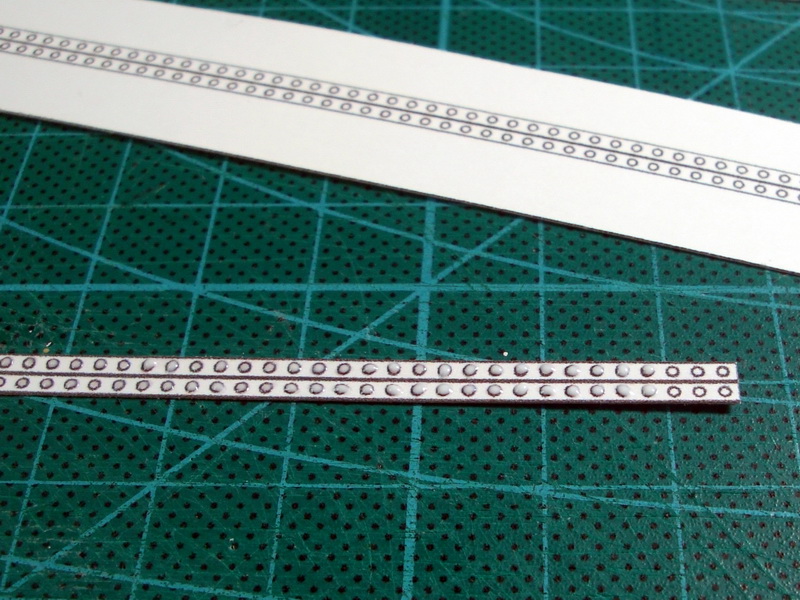
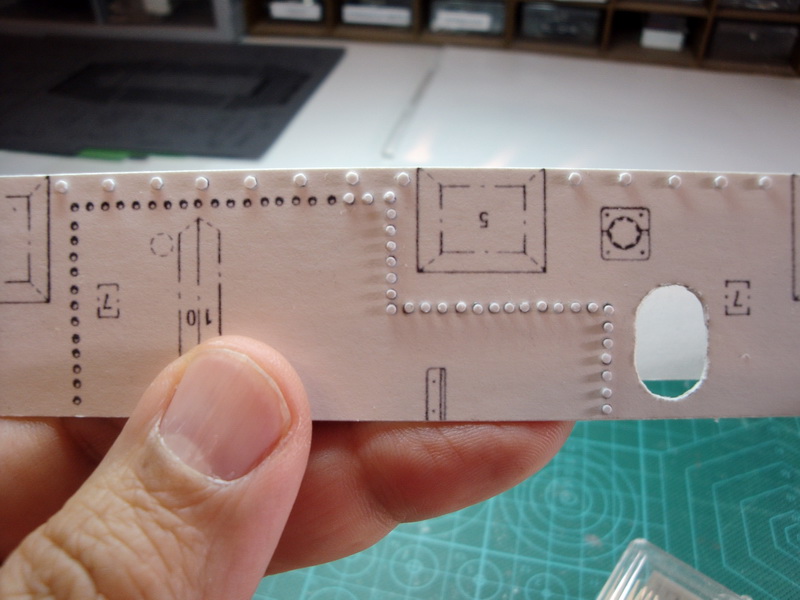
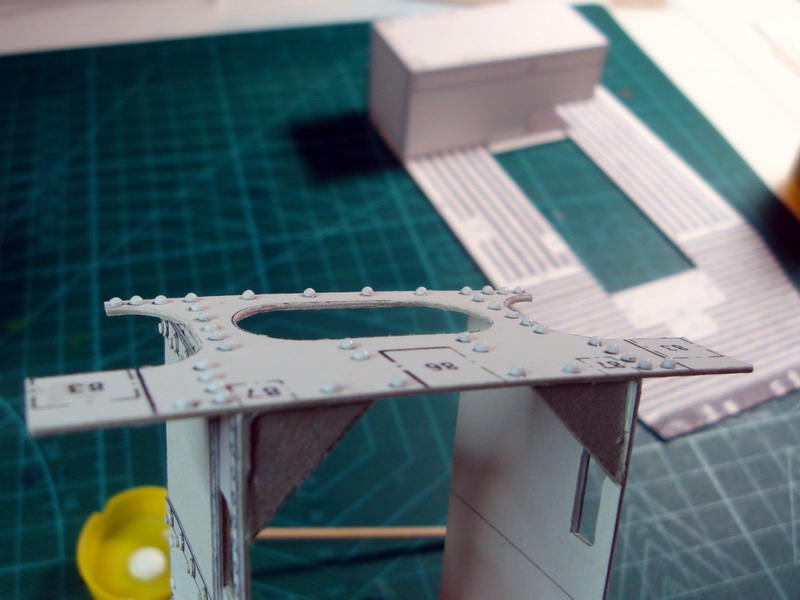
Eventually I decided to use 3 different methods depending on different situations:
1) very little rivets (in covered spots, not very visible) are made putting little drops of PVA glue with a toothpick: even if they are not all identical this won't be noted too much (next photo)
2) medium size rivets and hex bolts are made with p&d and plasticard and glued one by one on the printed part (next photo)
3) bigger and more visible rivets, where the rounded head is an important feature, are made in plasticard with p&d (bigger diameter) and a drop of pva glue is added later on top of them with a toothpick. The plasticard piece force the drop to mantain a certain diameter so the final result is not so bad (next photo)
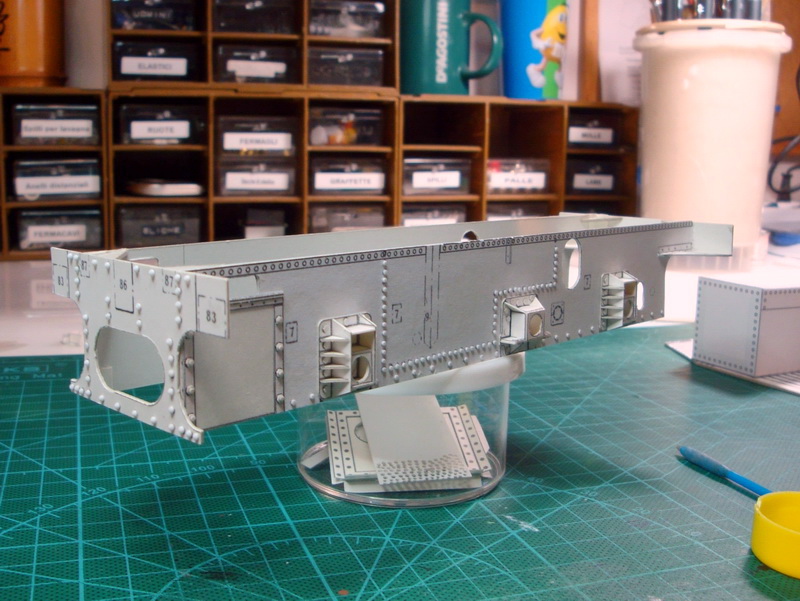
So this is the status of my chassis now...

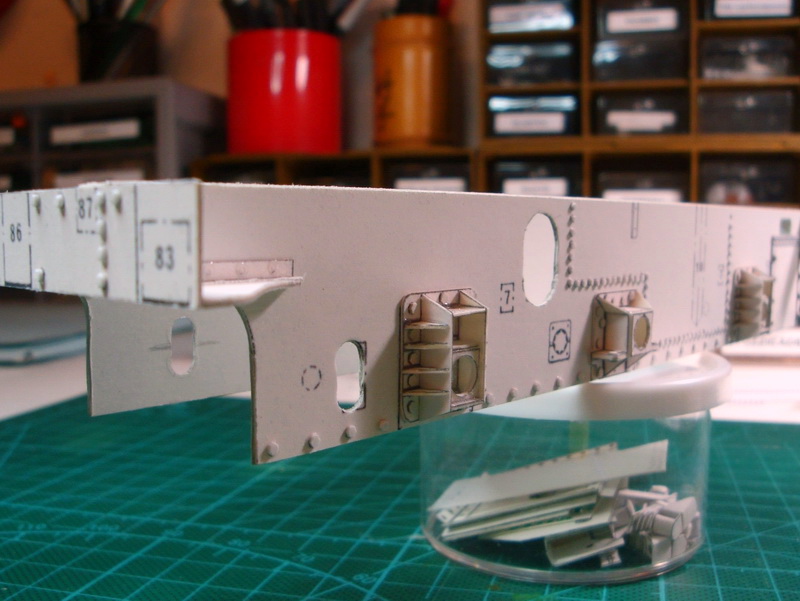
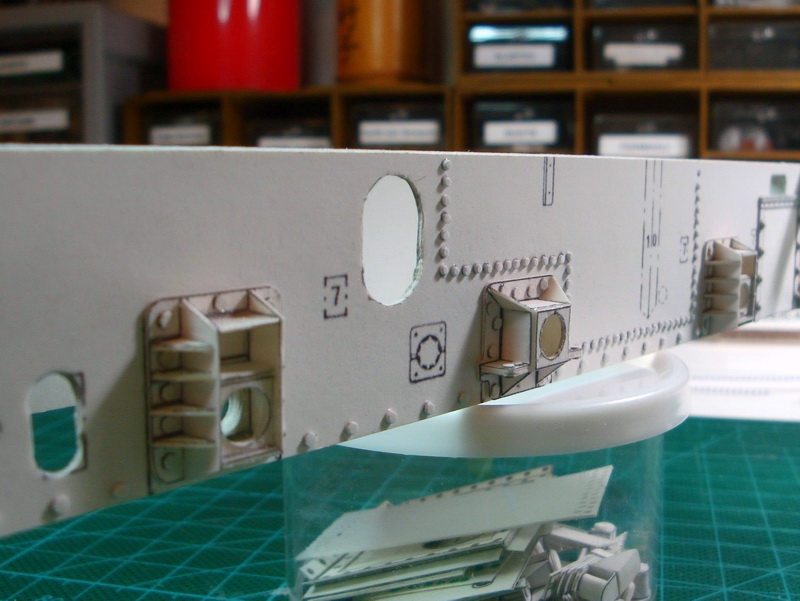
See you soon... (I hope!)

Tonino- Mitglied

Frank Kelle, Glufamichel, karl josef, didibuch, maxl, Spur 1, Rudi Bahn und mögen diesen Beitrag
 Re: Another Glaskasten build
I'm happy when I see what you make! It's great


Babbedeckel-Tommy- Klebt besser als Sekundenkleber

Tonino mag diesen Beitrag
 Re: Another Glaskasten build
Don't worry about us - we have patience too!
Best wishes
Michael

maxl- Forenurgestein

Tonino mag diesen Beitrag
 Re: Another Glaskasten build


doc_raven1000- Modellbaumeister

Tonino mag diesen Beitrag
 Re: Another Glaskasten build

I've drawn water tank taking as a reference the original model parts (N° 36 and 36a, as the upper section, the only one provided, is sliced in two parts, one inside the cabin and one outside) My newly designed tank seemed to fit well on its contour on the original locomotive scheme (that I printed in the same scale of the model to check dimensions of every new part I realize).

But...surprise! If I put the tank in the chassis the fitting doesn't seem to be so good. The tank protrudes from the lateral aperture and doesn't seem to follow the rivets already put on the side wall...

Strange! if I take them separately, all the parts seem to be the right size, once i put them togheter it's a mess. Where is the mistake?
I don't know, but, at this point, the only measure I can think of to resolve the situation is to shorten a little the tank, hoping this won't give fitting issues with next building phases...
Here is the new tank shortened 5 mm in the rear section.
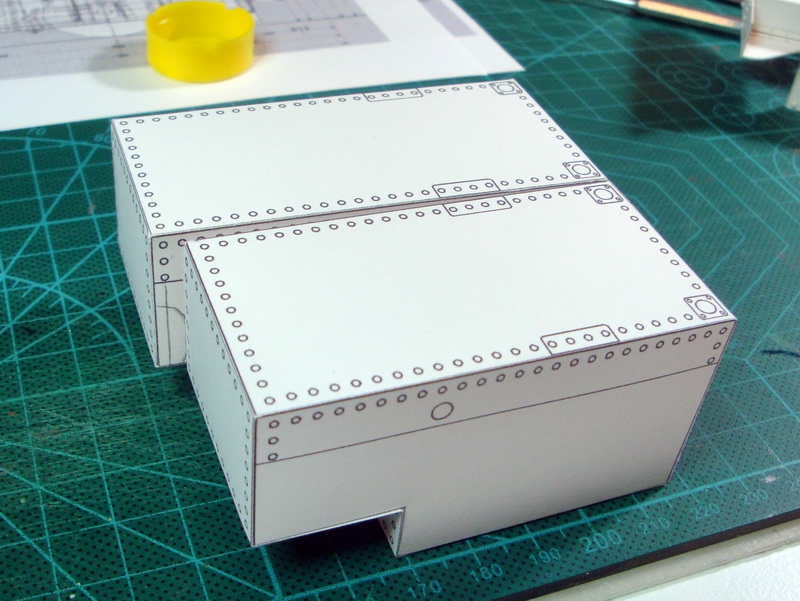
And this way the fitting seems to be slightly better
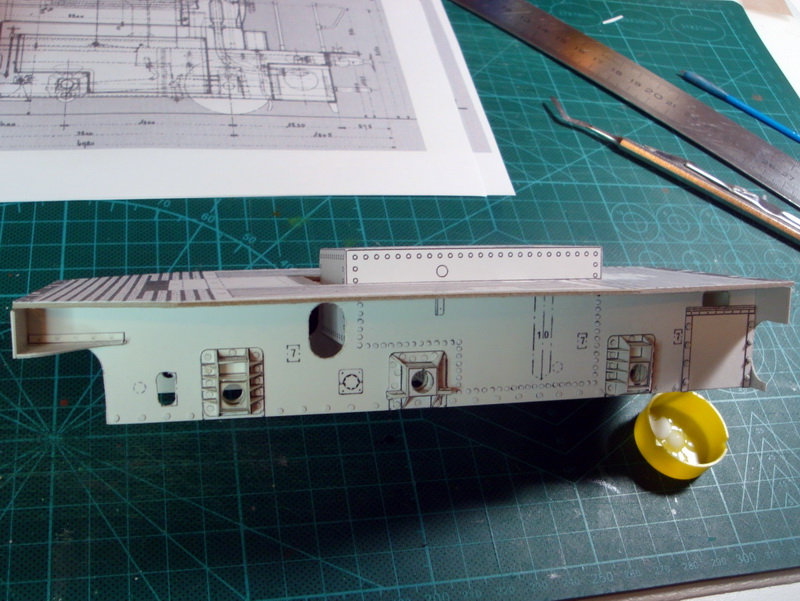
Again, I don't see where my error is and I don't know if, this way, the tank is not accurate for proportions or dimensions. This is the best workaround I could imagine whitout starting over again from the beginning...
Did you experience something similar in your build Michael?

Tonino- Mitglied

doc_raven1000, didibuch, maxl, Spur 1, Rudi Bahn, klaus.kl, Classic und SvenMo mögen diesen Beitrag
 Re: Another Glaskasten build
 I´m not afraid of this problems
laiva-ukko- Forenguru

Tonino mag diesen Beitrag
 Re: Another Glaskasten build
The bigger one inside the cabin, the smaller one outside. Later on there must be space enough to install the two water funnels outside the cabin.
You need the longer tank. Don't worry about the position of the rivets you already made. Its is much more important to put the tank in the right position.
I did the same and I wish you luck! You will make it!
Greetings
Michael

maxl- Forenurgestein

Tonino mag diesen Beitrag
 Re: Another Glaskasten build
I thought about your warning but, all considered, I think my modification won't be a problem because I shortened the tank only in its rear section.
The front one finishes in the same position than before the "cutting". As you see I have already traced the position of the funnel plaques on the tank and they are in the same spot in the two versions. In the same time I realized that in your model the back side of the tank left an open space, didn't reach the edge of the opening in the floor (next image is from your thread)
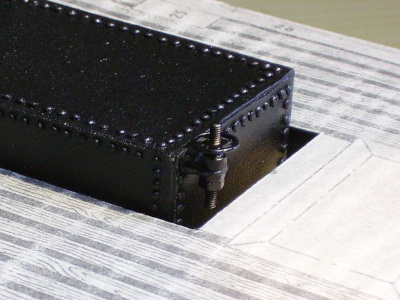
and now my model has this open space too,

so I hope I'm on the right way...


Tonino- Mitglied

didibuch, maxl, Spur 1, Rudi Bahn, Classic, laiva-ukko und SvenMo mögen diesen Beitrag
 Re: Another Glaskasten build
Looks pretty much like that, Tonino! As long as there is enough space for the funnels outside the cabin, everything is fine.Tonino schrieb:so I hope I'm on the right way...
The open space in the back is needed for some devices you might build or not. This part will be almost completely invisible so it really doesn't matter!
By the way - I did the tank twice too. So you are in good company!
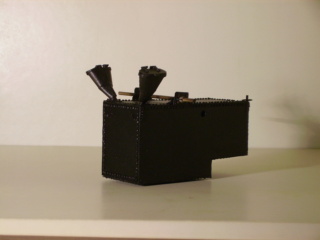
Best wishes
Michael

maxl- Forenurgestein

Neubahner, Tonino und SvenMo mögen diesen Beitrag
 Re: Another Glaskasten build
congratulations for your excellent riveting work!
Coming back on the water tank, I think, your first picture shows, that your first water tank is somewhat too long to the drawing. If you continue the last drawn vertical line of the tank on the left upwards, you don‘t end up at the edge of your tank, but in it‘s rivets. According to the drawing, there is a spindle attached to the rear side water tank, and you build water tank ends at the center line of this spindle - this is obvious, if you dont focus the front-side of the tank, but its rear side, which lies on the paper in order to eliminate the perspective.
But quite obviously, with your correction, it seems to be 100% correct.

Lupo60- Modellbau-Experte

Tonino mag diesen Beitrag
 Re: Another Glaskasten build
And thanks to you too, Wolfgang, you're absolutely right... I probably was induced in error taking the measures from the original kit parts (where the tank is splitted in two parts) and perhaps the little imprecisions summarized in just one direction, like stated in one of the ever-right Murphy's laws (Klipstein's laws applied to general engineering applied to prototyping and production: "Tolerances will accumulate unidirectionally toward maximum difficulty to assemble")
I'm here with little progresses, as always.
This time I start buiding cylinders.
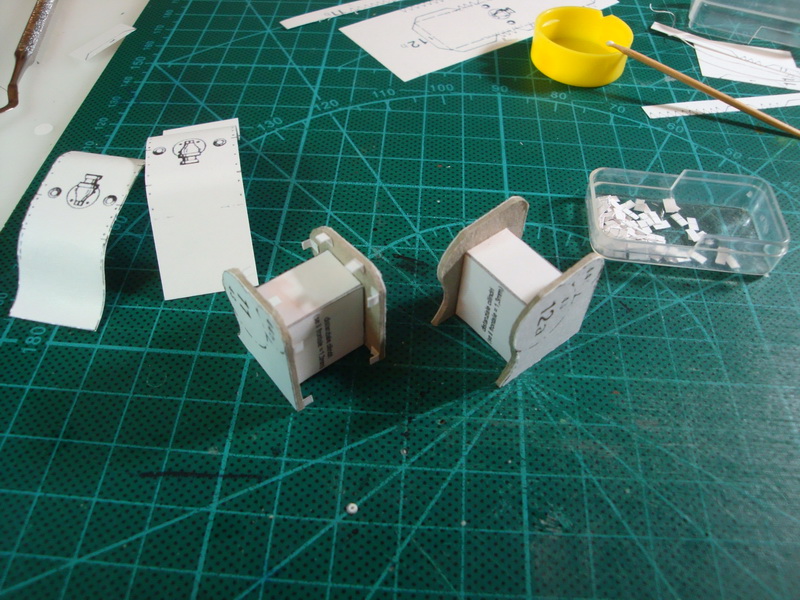
I created spacers to help keep the walls parallel while adding the curved surface. I also added little tabs to help the process.

The tabs help keeping the curved piece in place while the glue sets.
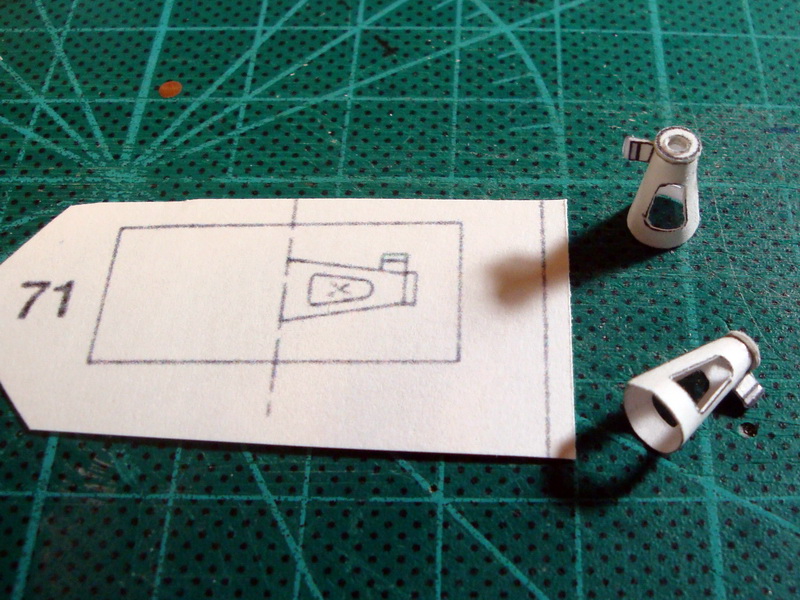
As always when I see a flat 2D piece I try to reproduce it in the real shape, I like very much to complicate my life...)

Cylinders are taking their shape.

Speaking about complicating my life... I decided to realize bolts and screws for the round caps. The bolts are 1,25 mm in diameter and the screws 0,75. Very hard to manipulate, also with tweezers. I placed a double sided adhesive tape on the desk just to avoid to loose all the work with a sneeze. The pieces are realized from 0,5 mm plasticard and joined with a micro-drop of Tamiya extra-thin cement.
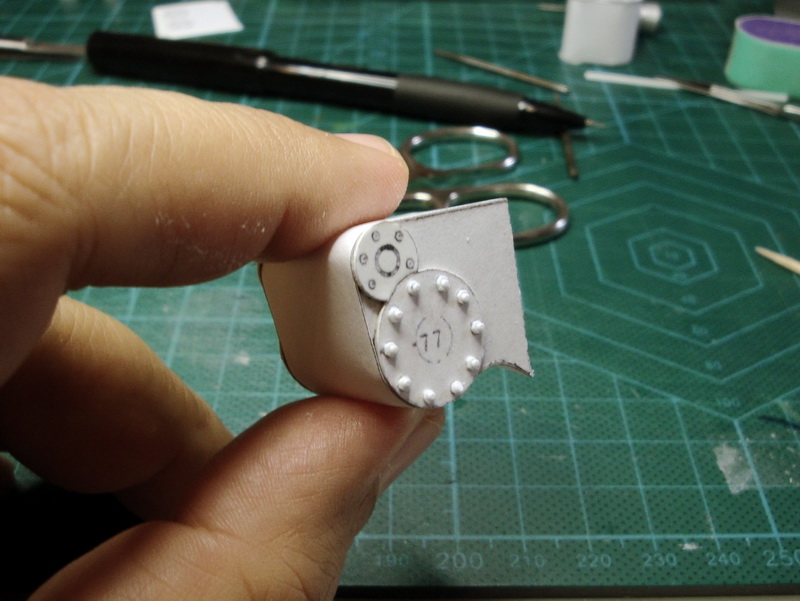
The result is worth the effort... I'm satisfied :-)

Tonino- Mitglied

John-H., Glufamichel, didibuch, maxl, Spur 1, Rudi Bahn, klaus.kl und mögen diesen Beitrag
 Re: Another Glaskasten build
Best wishes
Michael

maxl- Forenurgestein

Tonino mag diesen Beitrag
 Re: Another Glaskasten build

Congratulations

laiva-ukko- Forenguru

Tonino mag diesen Beitrag
Seite 1 von 2 • 1, 2 
 Ähnliche Themen
» Glaskasten
» Glaskasten PtL 2/2 - Teil I
» Glaskasten PTL 2/2 im Glas
» Glaskasten PtL 2/2 - Teil II


